
Approaching UMS Prometheus is the sixth map of the single-player mode of Unreal Mission Pack: Return to Na Pali.
Map description[]
The map is at night, you can see the UMS Prometheus from the highest parts of the map, as you go down you'll meet with Nali and their houses. You'll need to go through a few caves and watch for pesky enemies to get through to the Prometheus.
Weapons and pickups[]
Weapons[]
| Weapon | Count | Location |
|---|---|---|
1 clip |
Ammo: In a crate in one of the houses. | |
W : 1 A : 4 packs |
Weapon: In a barrel inside a cave past the Nali village. Ammo: In two barrels in one of the houses in the Nali village. (1,1) In two crates inside a cave past the Nali village. (1,1) | |
W : 1 A : 2 clips |
Weapon: In a UMS crate in the Nali village. Ammo: In the same UMS crate in the Nali village (2). |

Pickups[]
| Pickup | Count | Location |
|---|---|---|
| Health | ||
2 |
On a table in one of the houses. (2) | |
4 |
In a cave behind a rock right at the beginning (1). Behind a rock past the enclosure at the beginning of the level (1). In the Nali village (2). | |
| Armor | ||
1 |
On a metal crate next to the elevator to the next level. | |
| Inventory | ||
2 |
In one of the barrels in the Nali village.In a crate inside a cave past the Nali village. | |
1 |
In a barrel in one of the house in the Nali village. | |


Monsters[]
| Monster | Count | Location |
|---|---|---|
| Passive and NPCs | ||
4 |
| |
1 |
| |
| Monsters | ||
2/3(Easy) |
| |
2(Easy)/3(Medium)/5(Hard/Unreal) |
| |
5 |
| |


Walkthrough[]
So, you have escaped from Glathriel Village in one piece. Now, you know that the object of your search is near. Pursuing your quest, you emerge in a small tract of land.
You start in the cave via which you left Glathriel Village. In a tunnel entrance ahead, a Gasbag sights you and attacks. Kill it. When it is dead, go towards the tunnel entrance and enter the tunnel, making a diversion to collect the Nali Healing Fruit on the right if you need to. Follow the tunnel's curvature round to the left. You will shortly emerge in a small tract of land. You are on a dirt path with a section of ground raised on your left.
Follow the dirt path. It slopes up to meet the level of the raised grassy area. The raised grassy area has a fence and a few plants but nothing of great interest. Watch out as you near the raised level, because you can expect to be spotted by some of a group of four Predators that patrol this level. Kill them as you proceed through the area.
Beyond the raised grassy area, the valley continues past a large rock on the left. Follow it through - there's a Nali Healing Fruit beyond the rock if you need it - and you will come out shortly in the middle of a cluster of three Nali huts. If you're in the mood for looking around, you can go round to the right of the rightermost hut. Passing a Nali Healing Fruit, a barrier will open and you will be in a Nali Cow pen. There's nothing of interest in there though.
Visit the huts one by one. The hut on the right contains a Nali praying by his fire. Raid barrels for two clusters of 40 Tarydium Shards, then read the Nali's diary on the table[1].
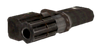
Leave and cross the settlement to the hut opposite. Barrels outside reveal a Nali Fruit Seed. Going in, you will find a Nali and a barrel containing a Flare. Go then to the third and final house, the one at the end. You will find another Nali, two Bandages on the table and wooden crates that reveal a Clip. When you're done, leave the house and go to the right where there is a UMS drop box generously supplied with two 50 bullet CAR Clips and a Combat Assault Rifle.
Whilst in this area, take a moment to go towards a gap in the cliffs where there is a fence with a break in it. You will realise then that you are looking out over a huge valley that contains your goal - the hulk of the UMS Prometheus.
It's a long way down into the valley, so don't jump off the cliff or you'll be smashed on the ground below. You'll see a UMS drop box on the floor of the valley but you can't get to it. Instead, return to the houses and make a left. You'll come to another fence with a gap in it, where you can collect a Nali Healing Fruit on the right if you need it.
Go through the gap in the fence and follow the valley on downwards. Shortly it ends in another tunnel entrance. Go into the tunnel and follow it down to the large cave beyond. Within the cave, you will see a ravine blocking your path with a precarious wooden bridge crossing it to the left. As you enter, two Gasbags will descend from the roof of the cave, causing a Nali on the far side of the bridge to run across it in a panic. The bridge collapses under the Nali's weight.
First things first, kill the Gasbags. Then, raid wooden crates on the left on this side of the ravine for two clusters of 40 Tarydium Shards. Now comes the tricky part - you may want to save your game first. Go on to the raised section of earth that the bridge crossed from. Take a good run up and try to jump across the ravine - if you fall short then you'll be squashed on the floor of the ravine.
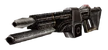
Once safely on the other side, take a look at the first tunnel entrance on the left and you will see that it is blocked by a large boulder. Open a barrel here for a Stinger. Then, go to the right and down a short drop on to a lower level. There's another tunnel entrance there, but first destroy wooden crates beyond for a Nali Fruit Seed. Take the tunnel entrance and follow it through until you come out in a mine cave. Watch out as you enter for four Spinners that attack from various corners.
Look around. To the left is a high-tech outcrop of Skaarj mine architecture. Ahead is an old Nali mine working.
Go down the old Nali mine working first. It comes to a dead end at a rock fall, but you can open barrels there for 40 Tarydium Shards and a Nali Fruit Seed. Return to the main mine cave.
Approach the high-tech entrance now (to the right as you return to the cave). There, you will see a Shield Belt on some large boxes. To get to it, locate a small metal crate and push it to the boxes, then use it as a step. When you've got the belt, go into the high-tech entrance and ride the lift within up to exit the level.
Quick Level Completion[]
- Leave the cave.
- Proceed through the village directly to the second cave.
- Inside the cave there is a bridge across the chasm, which collapses as soon as the Nali steps on it.
- Deal with the Gasbag/s and make a running jump from the higher ledge to the lower edge on the opposite side of the chasm.
- Go through the opening (don't mind the opening on the upper ledge, it is blocked off by a cave-in) and turn left immediately after leaving the tunnel. There is an elevator to the next level. The mining shaft is a dead end.
Difficulty Differences[]
- Only 2 Gasbags appear on Easy difficulty - one in the first cave at the beginning and one in the second cave at near the end of the level. On higher difficulties, there is another gasbag appearing in the second cave, forcing the player to fight two of them at once.
- Only 2 predators appear on Easy, whereas there are 3 and 5 predators appearing on Medium and Hard/Unreal difficulties respectively. All of them can be found around the enclosure near the Nali village at the beginning of the level.
Tips and tricks[]
- Use the CAR with the Predators.
Trivia[]
- Levelshots for the map were added in the OldUnreal version 227j patch.
Gallery[]
 Approaching UMS Prometheus - Unreal RtNP (18 KB)")
")
")
")
")
")
External links and references[]
- ↑ Universal Translator: "Another Thunderbird has fallen from the sky, right before our eyes! I am very scared. Scared that the Skydemons will come to our valley now."