DmRadikus (a.k.a. Radikus) is a Deathmatch map for Unreal.
Map description[]
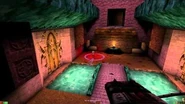
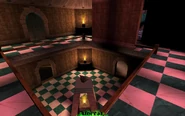
A Sunspire-esque castle, Shane's specialty, with plenty of areas of interest, which are colored in the map below. The map makes heavy use of the Warpzones, connecting plenty of areas with this feature.
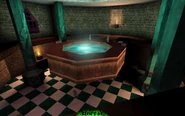
The red area is the North area, which holds two subzones: the North zone (the octagon at the very north of the map) and the Trap area (in the middle). Overlooking the Trap area is the Balcony, which holds a Rifle and a DP powerup. The former is an octagon with two levels and a warping pool (we'll call it Round room). The blue area is the Shrine area, it contains three levels, one of which is secret (see Tips and Tricks) and holds plenty of material; the other two are connected by way of a platform. The Shrine area is connected with the Outside area in both the lower and middle levels. The middle level leads to two balconies overlooking the area, there's also a third balcony straight from the entrance, while the lower level has a passage which splits in two entrances; aside of these balconies, this area hosts a water river with a bridge over it. The Outside area is connected to the west via river with the West Chamber (light yellow), to the east via river with the East chamber (cyan), and to the south to the Dark passage, which contains a teleporter and also leads to the Bridge and teleporters area (both of these areas are colored in light orange). This last area holds three of the level's warpzones (Bridge left and Bridge right are teleporters while Bridge is a pool which can only be entered with the Jump boots from the lower level).
The warping pools and teleporters are two-way and connected in the following way: Round room-Bridge; Balcony-Water left; Water right-Bridge left and Dark passage-Bridge right.
Weapons and pickups[]
Weapons[]
(+)The Automag and the Minigun share the ammo.| Weapon | Count | Location |
|---|---|---|
U : 5 |
Upgrades: 1x North zone, below the warp pool. 1x Balcony overlooking the Trap zone. 1x Outside area, West balcony. 1x Outside area, East balcony. 1x Bridges and teleporter area, upper level. | |
W : 1 A : 4(*) |
Weapon: Shrine area, middle level, ledge opposite to the platform. Ammo: Clips: 1x Shrine area, middle level, near entrance to the Balcony. 1x Shrine area, middle level, near entrance to the Outside area. Boxes: 2x Near the Lava trap. | |
W : 1 A : 4 |
Weapon: North zone, upper ledge of the octagon. Ammo: 1x North zone, left ledge. 1x North zone, right ledge. 1x Outside area, near the river. 1x West chamber. | |
W : 2 A : 6 |
Weapon: 1x Outside area, balcony from the Shrine area. 1x Bridges and teleporter area, upper level, between entrances to the Outside area passages. Ammo: 2x North zone, border of the Warp pool. 1x Shrine area, middle level, between the Clips and the Automag. 1x Shrine area, middle level, between the Automag and the entrance to the Outside area. 1x East chamber, behind the teleporter. 1x Hidden in a wall near the B&T ASMD. | |
W : 3 A : 6 |
Weapon: 1x Shrine area, upper level. 1x East chamber. 1x Bridges and teleporter area, lower level, at the shrine. Ammo: 2x Shrine area, near the Eightball. 2x Outside area, near the river. 1x West chamber. 1x East chamber. | |
W : 3 A : 6 |
Weapon: 1x North zone, near the DP Upgrade. 1x Shrine area, upper level. 1x Outside area, near entrance to the Southeast upper passage. Ammo: 2x Shrine area, near the Flak. 2x Outside area, near entrance to the Northeast passage. 1x East chamber. 1x Bridges and teleporter area, upper level. | |
W : 1 A : 1 |
Weapon: Outside area, bridge. Ammo: West chamber, behind the teleporter. | |
W : 1 A : 4 |
Weapon: Bridges and teleporter area, in the floating warp pool. Ammo: 1x Shrine area, lower level. 1x East chamber. 2x Near the weapon. | |
W : 3 A : 6 |
Weapon: 1x Near the Balcony DP upgrade. 1x Shrine area, upper level. 1x Outside area, near the entrance to the southwest upper passage. Ammo: 2x Shrine area, near the Rifle. 2x Outside area, near the entrance to the northwest upper passage. 2x Hidden in a wall near the B&T ASMD. | |
W : 1 A : (+) |
Weapon: Near the Lava trap. |
(*) 2 bullet clips, 2 bullet boxes.
Pickups[]
| Pickup | Count | Location |
|---|---|---|
| Health | ||
7 |
1x Shrine area, middle level, near the platform. 1x Behind the Dark passage teleporter. 1x West chamber, behind the teleporter. 1x East chamber, behind the teleporter. 1x Bridges and teleporter area, lower level. 1x Bridges and teleporter area, upper level, behind the Bridge right teleporter. 1x Bridges and teleporter area, upper level, behind the Bridge left teleporter. | |
2 |
1x Shrine area, upper level. 1x West chamber. | |
3 |
1x Outside area, near lower entrance to the split-passage to the Shrine area. 2x Outside area, near entrance to the Dark passage. | |
| Armor | ||
1 |
Atop the Shrine area shrine. | |
1 |
Near the Lava trap. | |
| Inventory | ||
1 |
Trap area, near the teleporter. | |
1 |
Outside area, near the river. | |
1 |
Trap area, near the teleporter. | |
Tips and tricks[]
- At the Shrine area, in order to reach the upper level, place yourself in the Armor position, with the Jump Boots (you need two jumps, so don't use the boots until this point), and then do a rocket jump, taking care of the place where you shoot. You can't do this just with the boots due to the required height, so you need an additional boost.
Trivia[]
- The map was considered for Unreal Tournament, and in fact appeared, untouched, in the betas. Needless to say, it didn't made the cut.
- The map had a hidden level entry text: "Let's get it ON!!!!!"
- Levelshots for the map were added in the OldUnreal version 227j patch.
Gallery[]
External links and references[]
See also[]
| Deathmatch maps for Unreal |
|---|
DmAriza • DmCurse • DmDeathFan • DmDeck16 • DmElsinore • DMfith • DmHealPod • DmMorbias • DmTundra • DmBeyondTheSun • DmExar • DmRetrospective • DmRiot
|
| Unreal Special Edition: |
| GW Press Addon: |
| Fusion Mappack: |
| OldUnreal v227 maps: |
| Cut maps: |


